Correcting Bullet Journal Mistakes


I’m messy, clumsy and still getting to grips with illustration and lettering so today’s topic is one I’ve had a LOT of practice at! Absolutely everyone makes mistakes in their bullet journal, so you shouldn’t let the fear of making a mess stop you from diving in. Thankfully, there are lots of ways to fix those happy little accidents. Plus, unless you decide to post pictures of it on the internet, no-one will ever see your journal, so it really doesn’t matter if it’s a bit messy.
If you read my last blog post, you will have seen that my first ever bullet journal was actually a kraft paper journal which forced me to think of more creative ways to correct mistakes. Lots of these methods can be applied to any colour paper, but I’ll touch on correcting errors specifically on kraft paper and blackout paper later in this post.
First up, I feel I should mention that prevention is better than a cure, and you can avoid a multitude of sins by sketching out layouts, lettering and illustrations with pencil first. Do I do this all the time? Absolutely not. On the rare occasions I do, I sketch lightly with a pencil, go over my lines with pen, wait for it to dry, and erase any visible pencil lines. These Tombow Mono Erasers are great for erasing precise areas if you don’t want to rub over your entire page.

White Pens
This is by far my most-used method for correcting mistakes in my bullet journal, and I much prefer them to using correction fluid or tape as you can be super precise. Nikki’s Supply Store carries three options:
- Sakura Gelly Roll
- Sakura Paint Marker
- Archer & Olive Acrylograph - available as part of a multipack
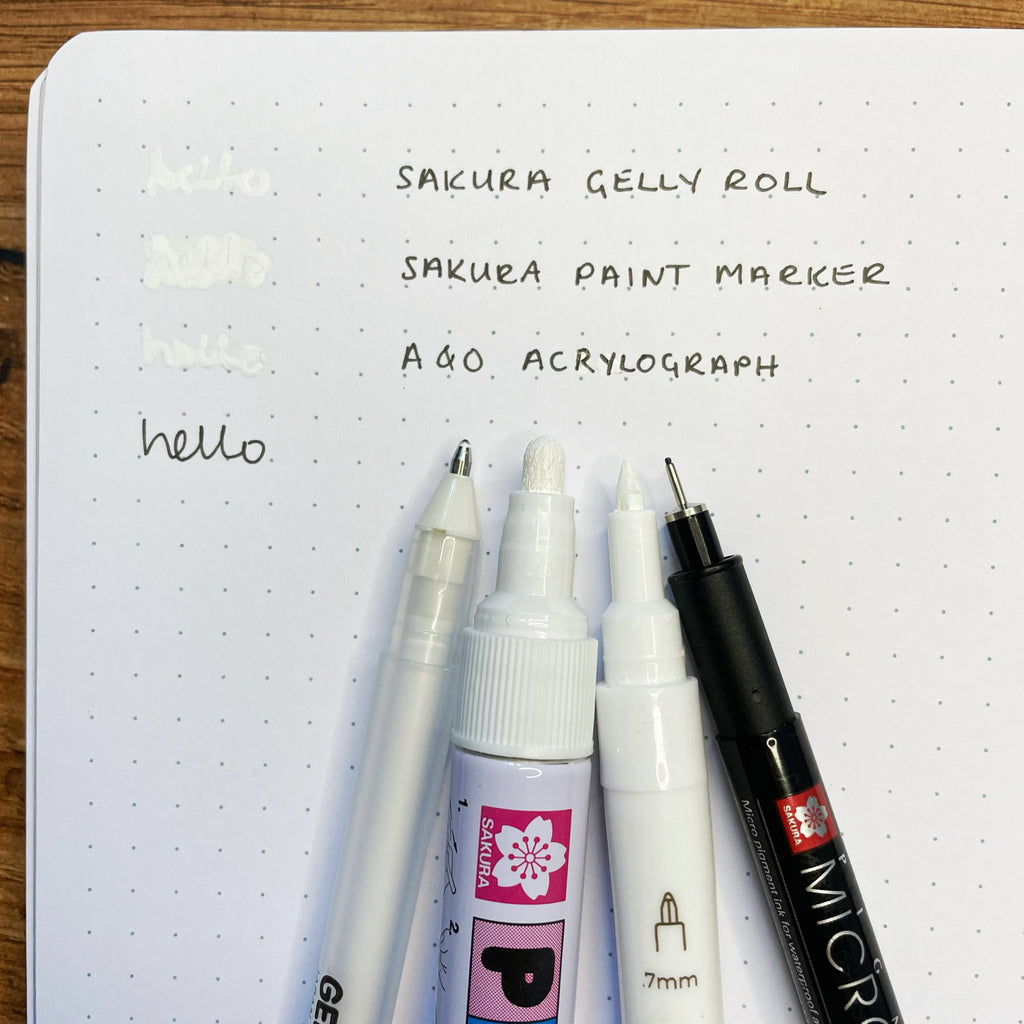
I’ve written “hello” four times with a Pigma Micron, and gone over the first three with the pens mentioned above. While the white ink is visible in this close up, I find that it disappears on a busy page. The most important thing to remember with this method is to LET IT DRY. Allow the “mistake” to dry completely before correcting, and make sure the white pen is dry before adding additional layers or closing your journal.
My go-to is the Gelly Roll 1.0 as it’s the most opaque in a single layer, although the Acrylograph dries quicker and flatter. I included some tips for using Acrylograph paint pens in my blackout journal blog post. The Sakura paint marker is new to me and I haven’t had a chance to try it out in a spread, but the chunky nib would be good for covering larger areas. Please note that it took three coats to achieve this level of opacity. All three can be written over with pen.
Can you spot the mistake that’s been corrected with white Gelly Roll? Oh yes. I wrote “Decembeb”.

If you’re correcting a small area of text such as a heading, you can colour over the mistake with a black or dark coloured pen, then write over the top with a gel pen. This is actually a great way to make a title pop and I often do this even when I’ve not messed it up! I use a Pigma Micron 08 for a small area and a Stabilo 68 for a larger heading. Avoid using alcohol-based markers like Sharpies, as these will even bleed through the 160gsm paper of an Archer & Olive journal!

Paper Patching
You can use paper that matches your journal, or a contrast colour to make it look totally intentional. Nikki’s A5 pastel dot grid pads are great for this! I painstakingly hand-lettered “August”…on my September cover page, but I covered it up with “perfect peach” dot grid paper and really leaned into the collage theme. You can see more of the ways I used the pastel dot grid pads in my first blog post.

I wasn’t happy with my lettering of “to do”, and a perfect peach paper patch (say that three times quickly) came to the rescue once again! If you zoom in, you can also see that I had second thoughts about the shading on the top petal of the flower, and coloured over it with a white Gelly Roll.

I totally messed up the word “October” on my cover page, so I traced the shape of the gravestone with tracing paper, and cut a new one. You can just about make out the edge of the paper on the left-hand side. I also corrected some smudging on the new gravestone with white pen. Told you: lots of practice!

Washi Tape & Stickers
A couple of strips of artfully placed washi tape at the edge of a page will cover up a border you regret starting, and it’s the perfect shape to cover headings and titles that have gone awry. You could either write on top of the washi, or use stickers like these adorable mini alphabet stickers from Pipsticks. Larger stickers are also a great way to disguise a doodle that went wrong, and Nikki stocks a wide range of sizes and designs. Check them out here!

Kraft and Blackout
As I mentioned earlier, my first bullet journal was an Archer & Olive kraft paper journal. I made a lot of mistakes and tore a lot of pages out (more on that later), but it meant I had lots of paper available for patching. I relied almost exclusively on the paper patching method, and these Tombow glue pens are great for attaching teeny tiny 1 x 1 square pieces of paper!
This was my first time using A&O Acrylograph paint pens, and they squelched under my stencil and made a huge mess at the top of the “Sunday” box. (Sidebar: Stabilo 68s are your stencil friends)

It was only as I came to the end of my kraft paper journal that I learned that Archer & Olive’s “moth wing” Acrylograph pen (from the “Cool Fall” set) is an almost perfect match for kraft paper. Again, I’ve written “hello” twice and covered the top one with the moth wing pen. Oh to have known this a year ago!

Finally: Black paper is a little more straight forward because, you know, black pens. I tested a few out for my blackout journal blog post, and found a Pigma Micron the most effective.

Absolute Last Resorts
I admit it: I was all too quick to tear out a page when I first started journaling. It seemed like a quick fix, BUT it really does make your journal disappear quickly, particularly if you tear out the corresponding page too. If you MUST do it: Hang on to the paper for patching. I only do this as an absolute last resort now, as I rarely make a mistake so monumental it can’t be fixed with one of the above methods.
Same goes for glueing two pages together. It makes for a very chunky awkward page that doesn’t turn smoothly or lie flat.
Thank you so much for reading! Don’t forget to tag @nikkissupplystore on Instagram if you’ve been inspired to try out any of these methods. Go forth and make beautiful mistakes!


